The basis of any operating system design comes down to meeting the users’ demands. Operating systems evolve in order to accommodate the emerging requirements proactively. The modifications involve both current system updates and new version releases. Every new version being rolled out is, technically, a major system update to an extent. For instance, macOS Catalina is a new operating system build superseding macOS Mojave and representing a major system update.
Any significant software platform update is likely to entail a range of issues. Evolution is not just about developments and improvements. It is also about trial and error. Luckily, macOS, just like any other managed system, evolves under its developer’s umbrella. Inconsistencies, bugs, and vulnerabilities are inevitable in a rapidly changing environment, but close monitoring and testing are to come up with patches fixing the weak links and deficiencies.
Slow Safari, similarly to other performance issues following Catalina update, is a problem reported by quite a few users. Some cases require no or very limited involvement of a user or expert. Others cannot be sorted out unless specific fixes are applied. Outdated hardware is a standalone case.
How do I fix slow Safari on my Mac?
Wait until the updating is complete
Should you see a notification stating that slow Safari and other performance issues are due to Mac update being in progress, there might be no reason to worry. Once the update process is completed, normal or even improved performance restores.
Since a lot of users encounter sluggish Safari performance following the upgrade to macOS Catalina, it might be just that they overlooked a relevant notification.
This transition period may take some time while the users need a fast and bug-free browser at any time. Here are a few things to consider in this regard:
A third-party browser
Safari is not necessarily the best choice, despite being the default and native Mac browser. It might be a good idea to have an optional browser close at hand. Google Chrome is a good alternative. The obvious advantage is that the period of macOS updates shouldn’t affect it. Furthermore, you benefit from having a plan B in such scenarios.
Ensure hardware and software compatibility
Check if your hardware meets the operating system requirements

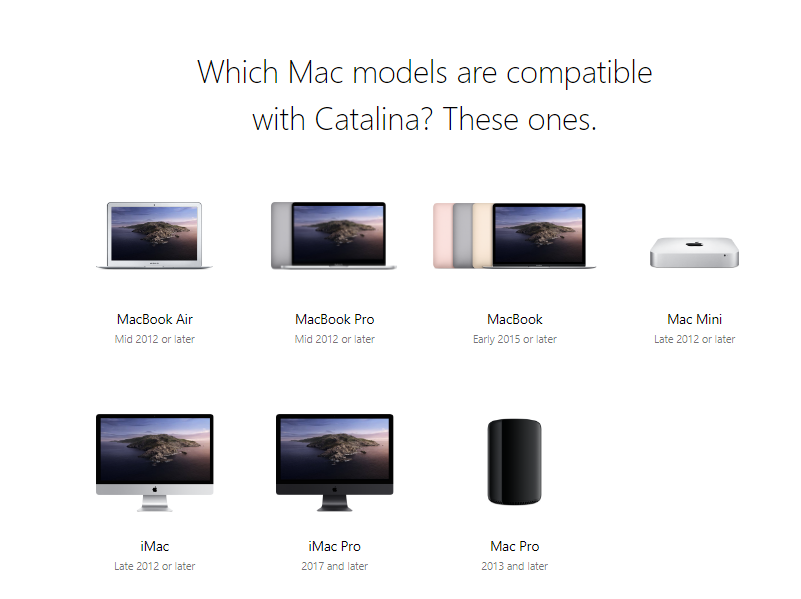
Any operating system has its system requirements. Apple declares macOS Catalina is supported by the following models:
- MacBook Pro and MacBook Air, 2012 and later
- MacBook 2015 and later
- Mac mini 2012 and later
- iMac 2012 and later
- iMac Pro, 2017 and later
- Mac Pro, 2013 and later.
The official updater would not let you install macOS Catalina on any machine older than specified above. So, what am I talking about?
The point is, too many users grab unofficial update packs that provide a workaround enabling an older device to get the all-new macOS installation. Odds are that such a tactic results in certain issues, slow Safari being a very likely one.
A similar reason for slow Safari could be that the browser version is incompatible with the macOS edition. By default, a macOS installation pack includes the latest Safari version. However, third-party custom packages may feature other combinations.
This contradicts macOS policy stating that Apple won’t assume any liability for such unofficial customization. Besides, a macOS version using a Safari build other than the officially prescribed one is likely to have the browser running too slow.
Ensure Safari and macOS versions are compatible
Apple official support states that operating system updates include a relevant Safari version. The issue of macOS and Safari version incompatibility should not occur unless you have applied in-depth customization and kind of hacked the macOS design.
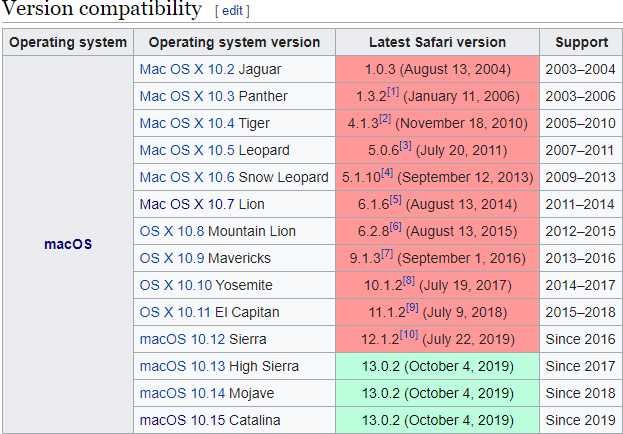
Safari and macOS versions correspond as follows:
That is to say, the two latest macOS versions do not feature new releases of Safari browser. Mojave and Catalina keep on using Safari 13.0.2 launched in High Sierra. Meanwhile, a range of new features is available in Safari updated with the Catalina
release.
To compare OS version against the Safari version installed on your Mac device and verify their compatibility, use the table above. Here’s how you can find your macOS version:
- Click the Apple logo in the left-hand upper corner of your Mac Desktop
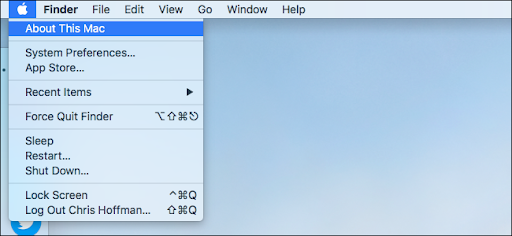
- In the drop-down list that appears, select the entry that says About This Mac
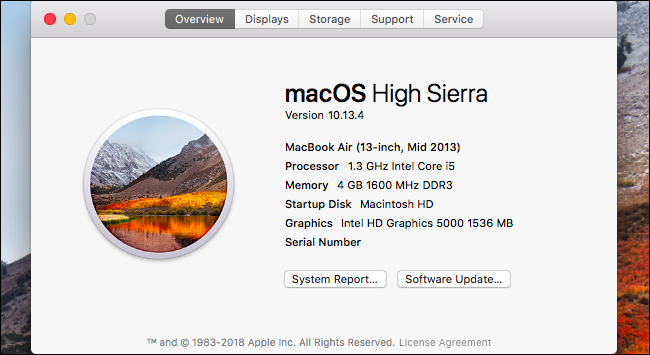
- This opens a window containing several tabs. Click the leftmost one saying Overview. It shows both the exact version name and number, including updates within the same version. For instance, on the screenshot below, 10.13 stands for the original
Mac App Store release that corresponds to its name, High Sierra. The figure following the version number represents the subversion within the High Sierra release.
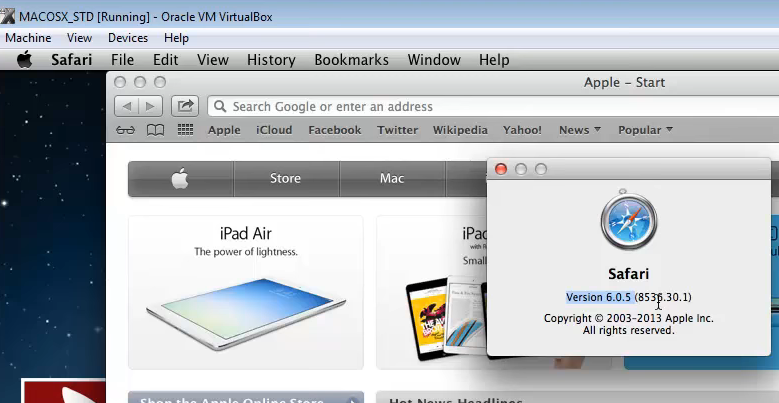
Now, you may want to see the Safari version installed on your macOS. It is not that easy to spot any visual differences between the browser versions, let alone remembering the version exact number. Here is how to find it in three simple steps:
- In the Dock, click Safari
 icon to launch the browser

- In the browser’s upper menu, click Safari, and proceed to About Safari
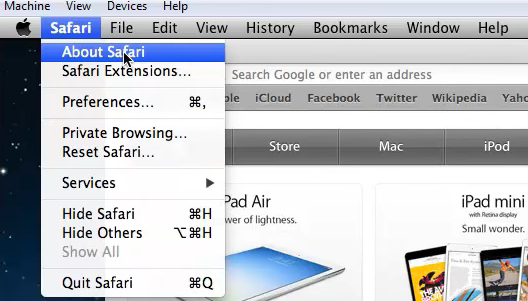
- Check your Safari version in the popup window
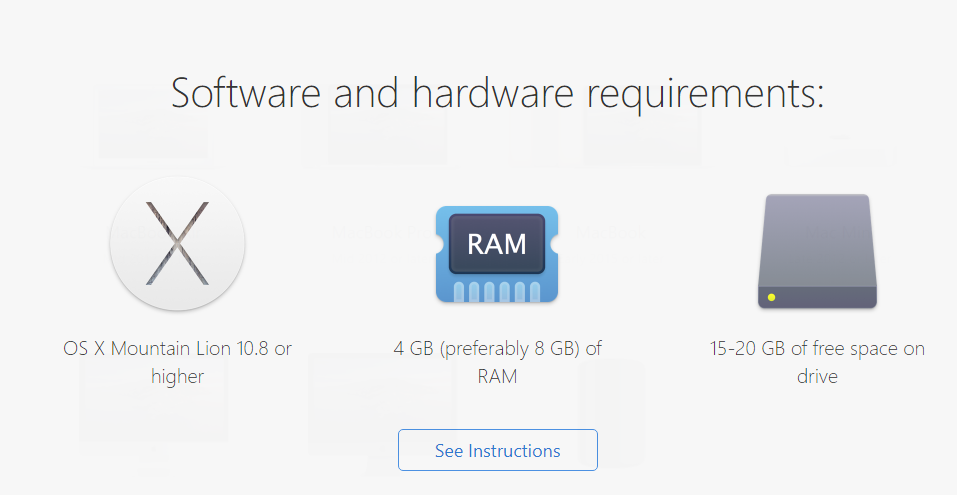
Last but not least, check if your hardware and current system are ready for the macOS version you are about to install. The latest versions (Catalina, Mojave, High Sierra, Sierra) have the following basic requirements:
– previously installed OS is not too old (at least OS X Mountain Lion 10.8)
– RAM is at least 4 GB (8 GB and more would be better)
– no less than 15 GB free space on the hard drive (20 GB and more would be better)
Fixing Safari internal issues
Whereas the steps above focus on the external issues causing the slow browser problem, Safari itself is a common source of its sluggish performance. The software needs scheduled maintenance anyway to keep making the best of its features and resources available. Let’s review the common reasons for Safari bugs and errors and how to fix them for good.
Issue 1: Keeping too many tabs open
It’s very simple. If you keep dozens of tabs open at once, some of them being ‘heavy’, Safari cannot run at its top speed. Close the excessive tabs.
Issue 2: History and Cache take up too much space
This might be a somewhat contradicting point. A browser hangs onto History and Cache data like images to load the same pages faster the next time you visit them. This reduces the loading time for repeatedly visited sites.
Meanwhile, the bulk of Cache and History data may make Safari much slower overall. Even the cached pages might load too long due to a shortage of resources. That is to say, they would load faster in a clean browser even without their underlying data stored in its memory. Consider cleaning History and Cache using the following steps:
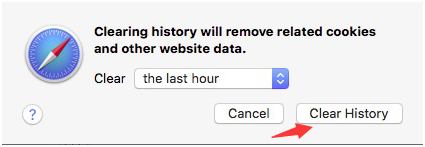
1. Launch Safari browser
2.1. This is option 1 for Step 2. Select History at the top, and click Clear History… at the bottom
2.2. This is option 2 for Step 2. Select Safari at the top, and proceed to Clear History
3. Select the time span for which you would like Safari history to be cleaned
4. Click the Clear History button
Issue 3: Search suggestions slow down and annoy
Despite not being a critical issue, search suggestions may leave a performance footprint. Turning them off may add a bit of speed just to meet your high demands. Besides, the relevant measure is easy to apply.
How to Disable Safari Suggestions on Mac? Here’s your step-by-step guide:
- Launch Safari browser
- At its top left, select Safari
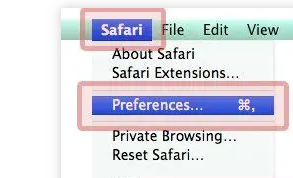
- Go to Preferences in the drop-down list
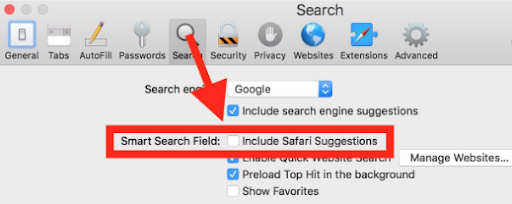
- This generates a window with multiple features and controls in it. You need the Search tab

- In the tab that appears, go to Smart Search field, and untick the box next to Include Safari Suggestions.
Issue 4: Plug-ins and add-ons affect Safari performance
Issue 4.1: Extensions
Extensions add useful features to the software they are intended for. They may also impose malicious or unwanted functionality and slow down Safari. In browsers, dubious extensions may trigger annoying redirects. Here is how to disable unwanted extensions in Safari:
- Launch Safari browser
- At its top left, select Safari
- In the drop-down list you’ll see, go to Preferences
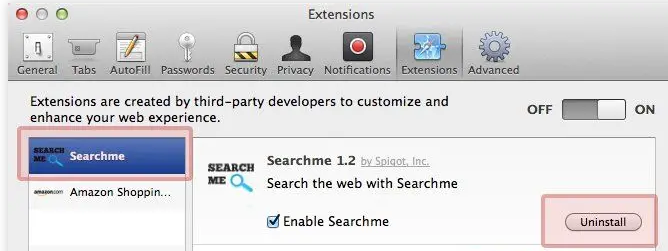
- Select the Extensions tab in the window that appears
- Check the list of extensions installed. Browse through the list in the left-hand part of the window. You can click the Uninstall button to get rid of any extension you find suspicious. Otherwise, disable it to see if this improves Safari performance.
Just uncheck the box alongside or below the potentially unwanted entry. You can also disable all extensions at once using the OFF/ON toggle in the right-hand upper corner of the panel
Issue 4.2: Other plug-ins affect Safari performance
- Launch Safari browser
- At its top left, select Safari
- In the drop-down list, click Preferences
- This generates a window containing the entirety of Safari features and controls. Select Websites
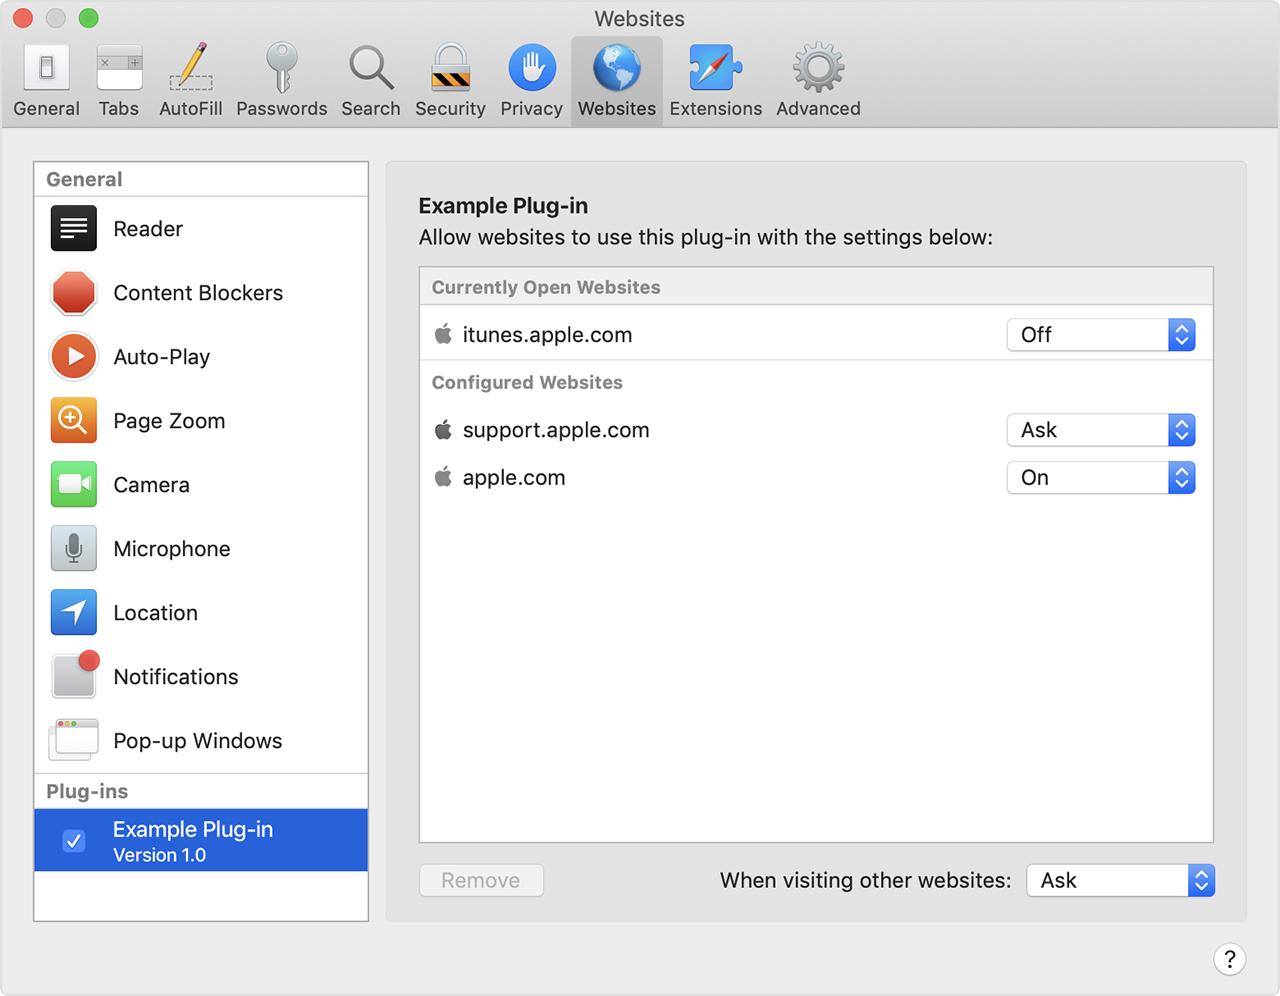
- In the Plug-ins area at the left-hand bottom corner, check and, if necessary, disable or remove entries using the appropriate buttons.
Issue 5: Disable excessive features
Safari keeps on acquiring new features. Some of them might be excessive, though. DNS Prefetching is one of the most common services that might slow down Safari.
This is a great solution enabling websites you visit to resolve at the background the links they include so that they load in a breeze as you click them. Unfortunately, this also commonly causes a slow browser problem.
You may want to disable DNS Prefetching to check its impacts on Safari performance. If you see no positive changes, turn this feature back on.
How to disable DNS Prefetching? This requires a bit of hacking, yet the steps are remarkably quick and easy to complete.
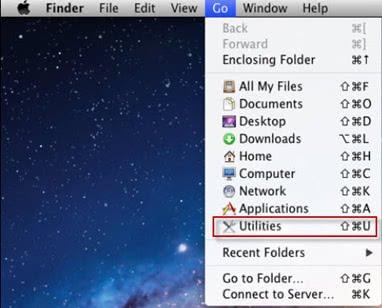
- At the Dock, open Utilities (or press Command-Shift-U)
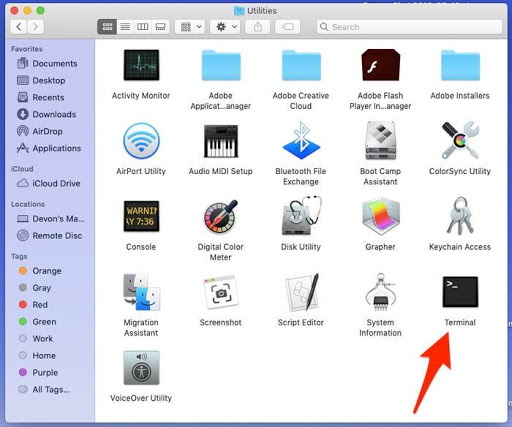
- In Utilities, click the Terminal icon
- Paste the following string into the Terminal:
defaults write com.apple.safari WebKitDNSPrefetchingEnabled -boolean false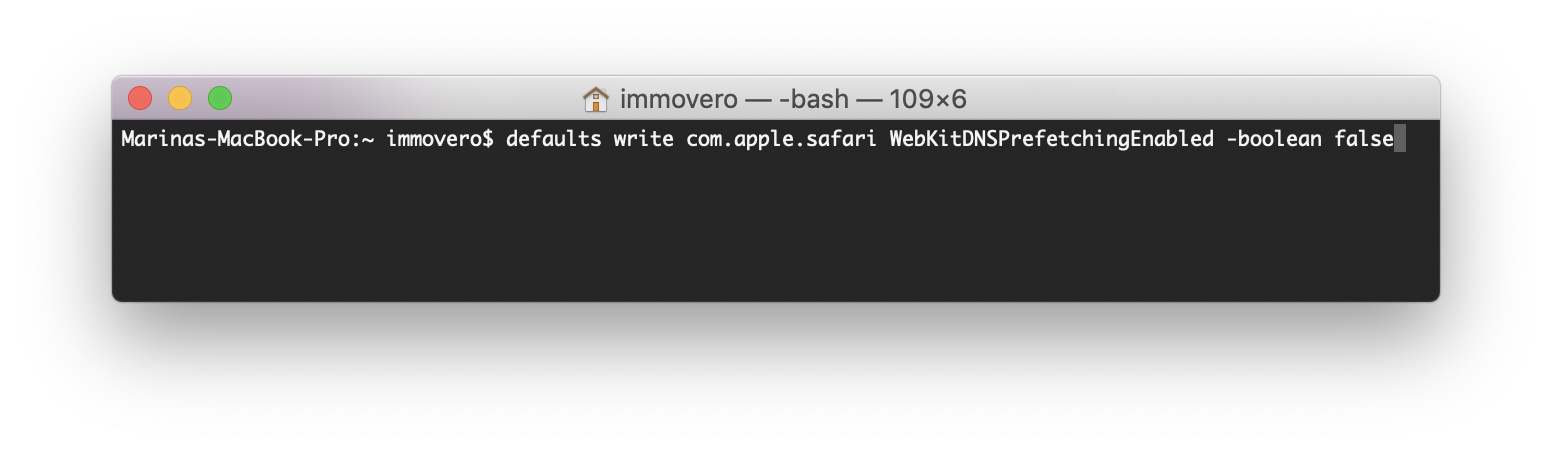
- Exit and restart Safari
On a side note, you can use a similar procedure to disable many other features burdening or otherwise affecting your browser. For instance, you can easily disable Content Blockers or even App Sandbox for the browser.
Is it a good idea to upgrade to macOS Catalina?
First of all, it is critical to secure any macOS upgrade with a backup. If you have any urgent projects managed in the Mac to be upgraded, you’d better postpone macOS Catalina installation till they are completed.

On the other hand, operating system evolution is inevitable. If the changes are revolutionary, it might be a good idea to take your time and wait for a stable release. Windows history has had its evolutionary dead-end releases.
There is hardly anything groundbreaking in the macOS versions introduced recently. They get so regular that we label them updates. Following such a smooth development seems to be a comfortable trip worth taking.
Why won’t Catalina install on my Mac?
Catalina cannot install if your hardware is too old. See if your device is fresh enough. Basically, most of the devices released since 2012 are compatible.
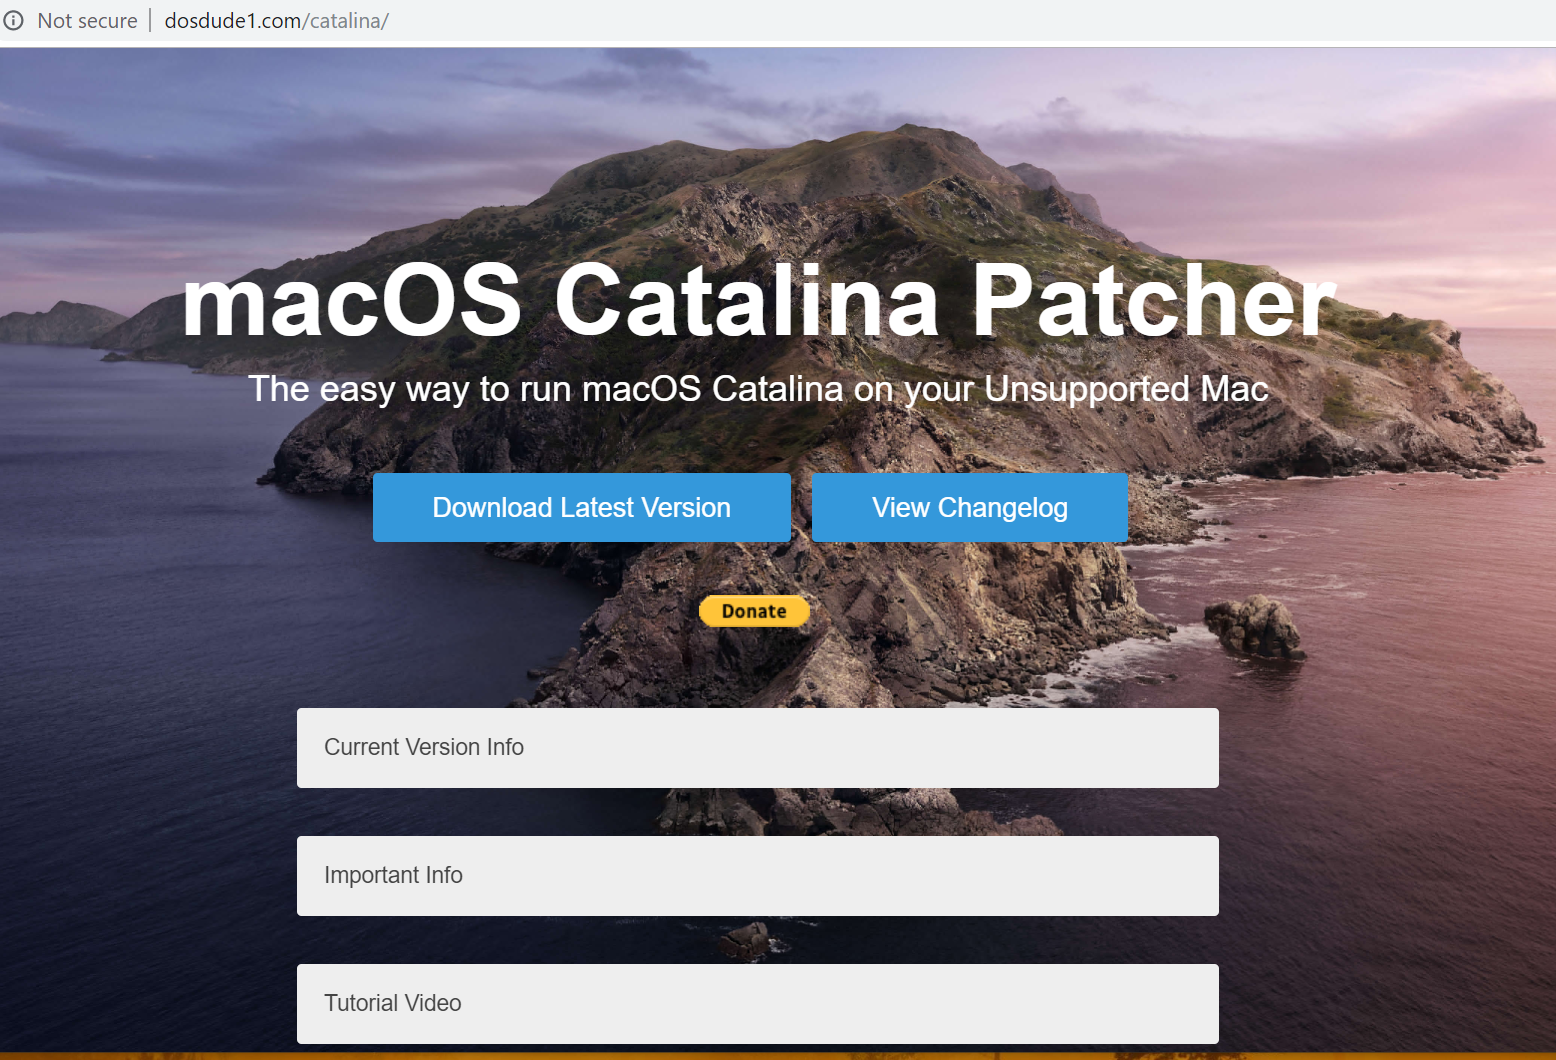
How do I install Catalina if my Mac is too old?
The short answer is as follows: http://dosdude1.com/software.html
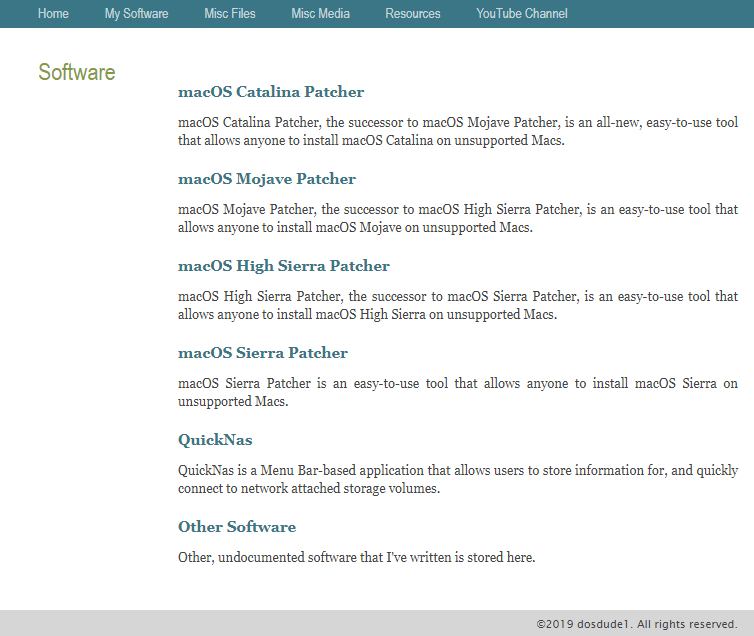
This website provides a patch enabling Catalina installation on any Mac device. It even provides a video tutorial. However, such a patch-backed Catalina installation might be the reason for Safari and overall macOS sluggish performance.
How do I check if my Mac has enough storage for Catalina to install?
Lack of storage space is another common reason for both sluggish performance and installation failure. To give you an idea, at least 6.5 GB of disk space must be available just to download the installation pack. To check the volume of free disk space, highlight the drive the Catalina is to be installed on and press Command-I. You can alternatively do this using the Finder menu.
- Go to Finder
 (available at the Dock)
 - Select the Devices tab
- Hover over the drive you want macOS to be installed on. Press Command-I or use context menu and select Get Info.
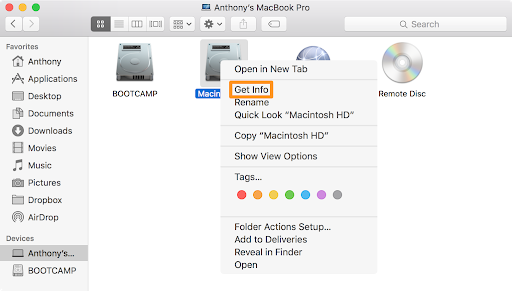
- Check if your free disk space is enough. Catalina requires at least 20 GB for proper installation and much more for proper operation.
Remove unnecessary apps, junk files, and suchlike data to free up space required for a successful installation. You may be able to release those game-changing gigabytes without having to remove any important data – just copy such data to external media like USB. Meanwhile, beware of fake cleanup software like the notorious Advanced Mac Cleaner rogue optimization tool. If you happen to get it on your Mac, your to-do list will be complemented with junkware removal in addition to tidying up the system for the sake of extra disk space.